The Step-By-Step Guide for blank server installation
The goal of this guide is to describe what needs to be done when you want to run a PHP/MySQL site like WordPress on IIS8 (WINDOWS SERVER 2012R2 x64).
I wrote it so I remember how the hell I made it to work.
The IIS Role should be already configured and the default website should be up and running when you connect to localhost via web browser. You should know how to configure file system rights on Windows.
The guide contains following chapters:
- Pre-steps
- Installing MySQL
- Installing PHP5.5
- Configuring IIS Options
- First PHP tests
- Installing phpMyAdmin
- Installing WordPress
Chapter 1 – Pre-steps
The MySQL installator cannot install ODBC plugin when some redist is missing. I recommend to install all Microsoft VC Redist runtimes. Although there is no need for all of them, this will be solved once and for all.
- 2005SP1_vcredist_x64.exe
- 2005SP1_vcredist_x86.exe
- 2008SP1_vcredist_x64.exe
- 2008SP1_vcredist_x86.exe
- 2010SP1_vcredist_x64.exe
- 2010SP1_vcredist_x86.exe
- 2012U4_vcredist_x64.exe
- 2012U4_vcredist_x86.exe (same link as above)
There is no URL Rewrite Module installed in the IIS by default. WordPress needs it to enable pretty permalinks and also for www to non-www redirect. Without it, WordPress alows you using “almost pretty” permalinks only. Download and install URL Rewrite Module from IIS website:
I also recommend to instal some good text editor like Notepad ++
And use IE as a downloader for Firefox.
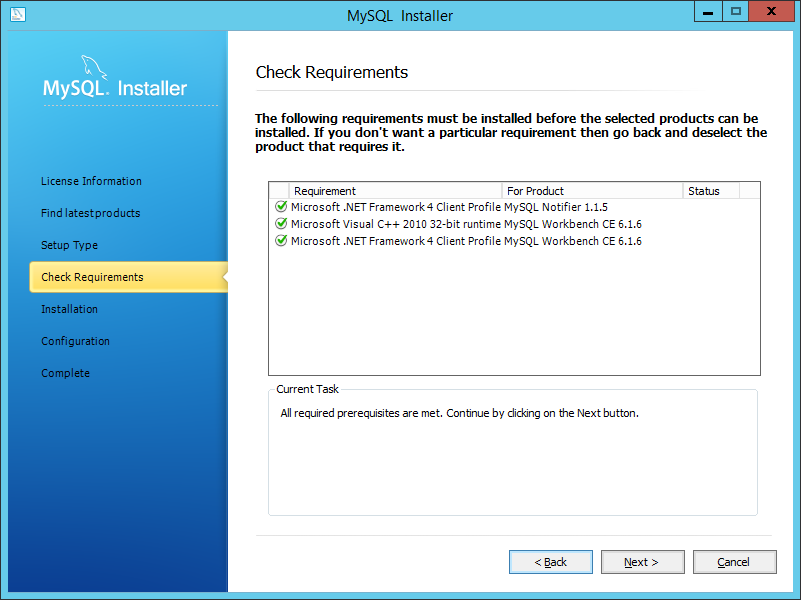
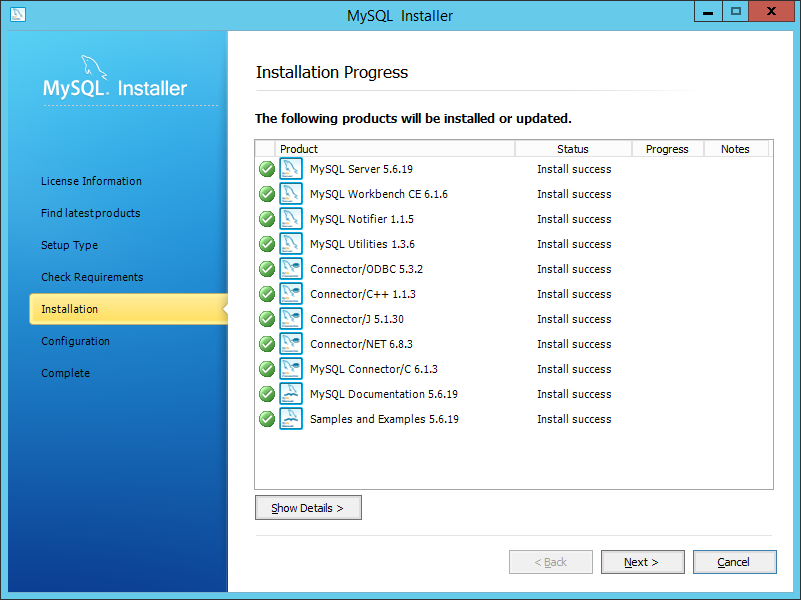
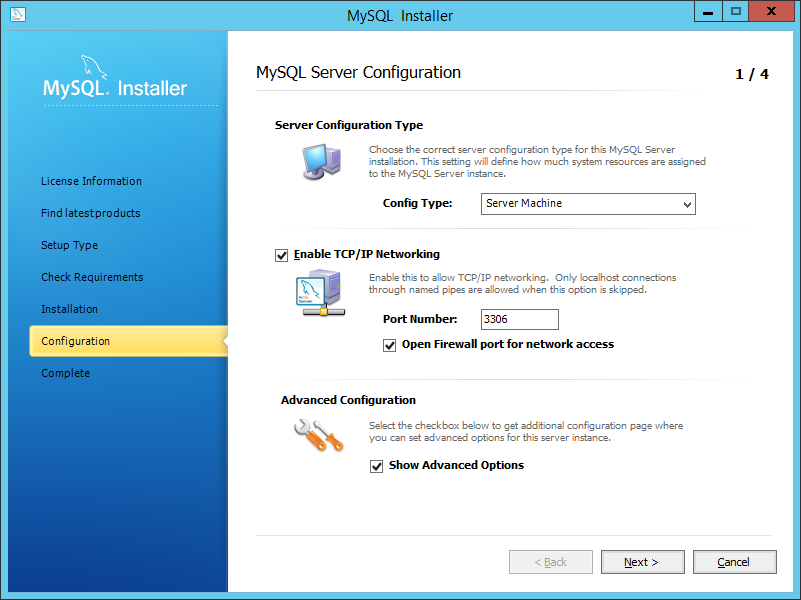
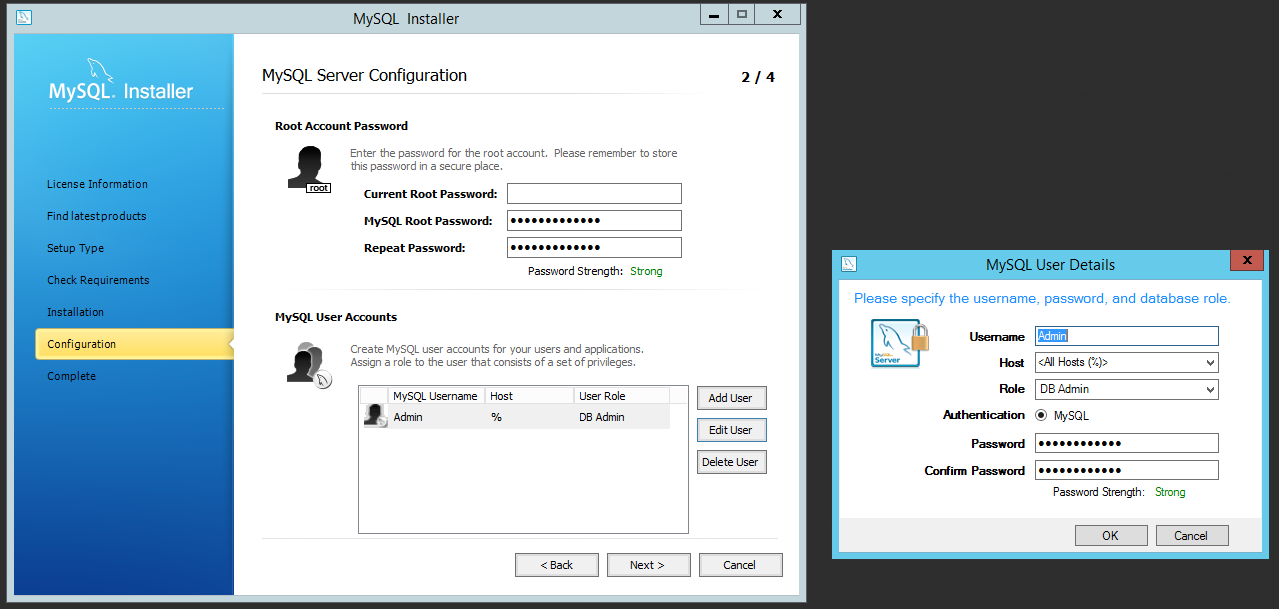
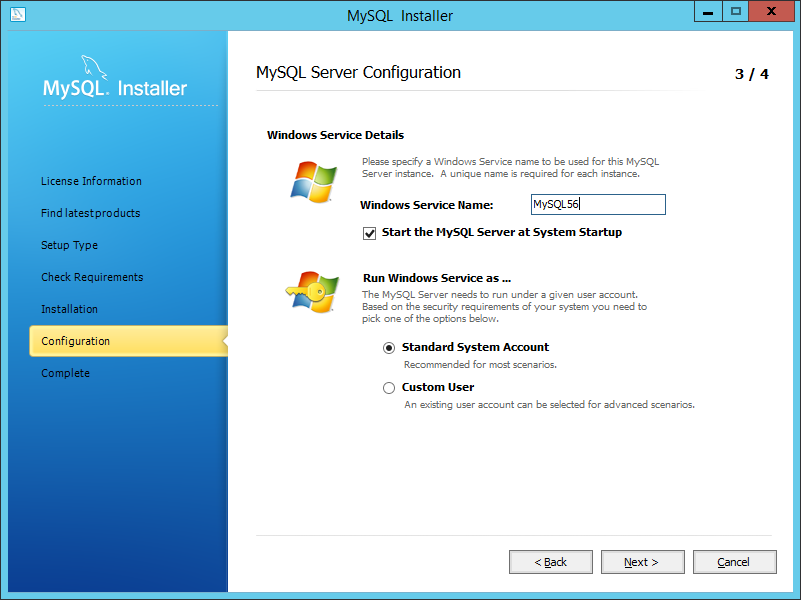
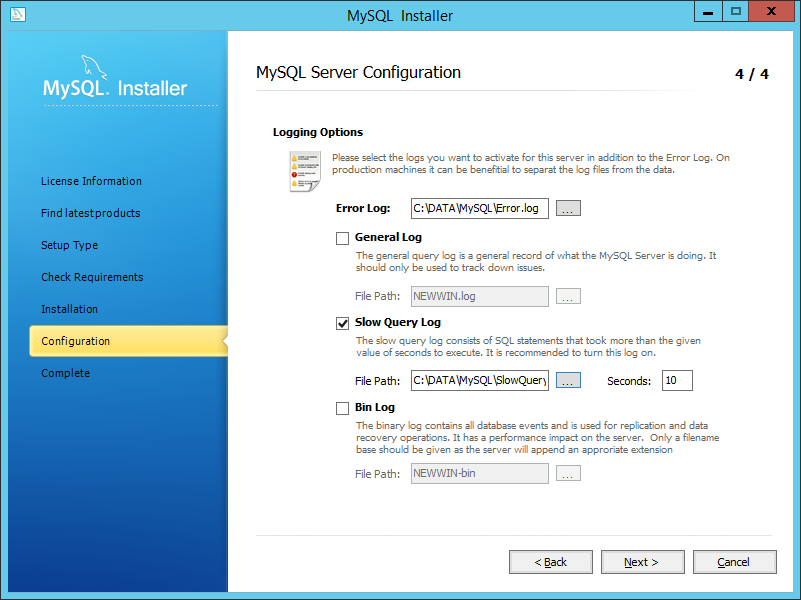
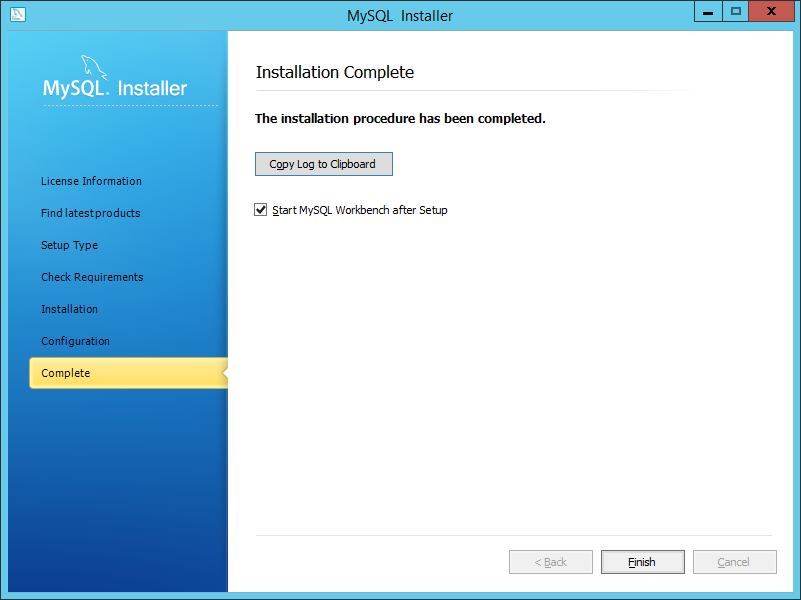
Chapter 2 – Installing MySQL
The MySQL instalator is only 32 bit but as they say it installs both 32 and 64 bit versions of MySQL engine. Download and run
I prefer the full installer but the web installer should do as well.
Click on the first gallery picture and read comments bellow


Chapter 3 – Installing PHP5.5
I describe deploying the ZIP archive as not all releases come with the installer. I recommend 32bit version as the 64 bit is still “at your own risk”. Download the Non Thread Safe version:
Or here:
Create following folders ( I prefer root of systemdisk, not Program Files as it contains space and its too long)
- C:\PHP\5.5
- C:\PHP\Uploads
- C:\PHP\Temp
Unpack the zip content so you have php-cgi.exe in C:\PHP\5.5\ folder. Copy php.ini-development to php.ini and open it (using notepad++). Uncoment and modify following variables:
error_log = "C:\PHP\php55_errors.log" ;handy
extension_dir = "C:\PHP\5.5\ext" ;"ext" does not work
sys_temp_dir = "C:\PHP\Temp"
upload_tmp_dir = "C:\PHP\Uploads"
upload_max_filesize = 128M

extension=php_bz2.dll
extension=php_curl.dll
extension=php_gd2.dll
extension=php_gettext.dll
extension=php_imap.dll
extension=php_mbstring.dll
extension=php_exif.dll  ; Must be after mbstring
extension=php_mysql.dll
extension=php_mysqli.dll
extension=php_openssl.dll
extension=php_pdo_mysql.dll
extension=php_pdo_sqlite.dll

extension=php_soap.dll
extension=php_tidy.dll
extension=php_xmlrpc.dll

date.timezone = Europe/Prague
session.gc_maxlifetime = 3600*24 ;24 hours
Save the changes!
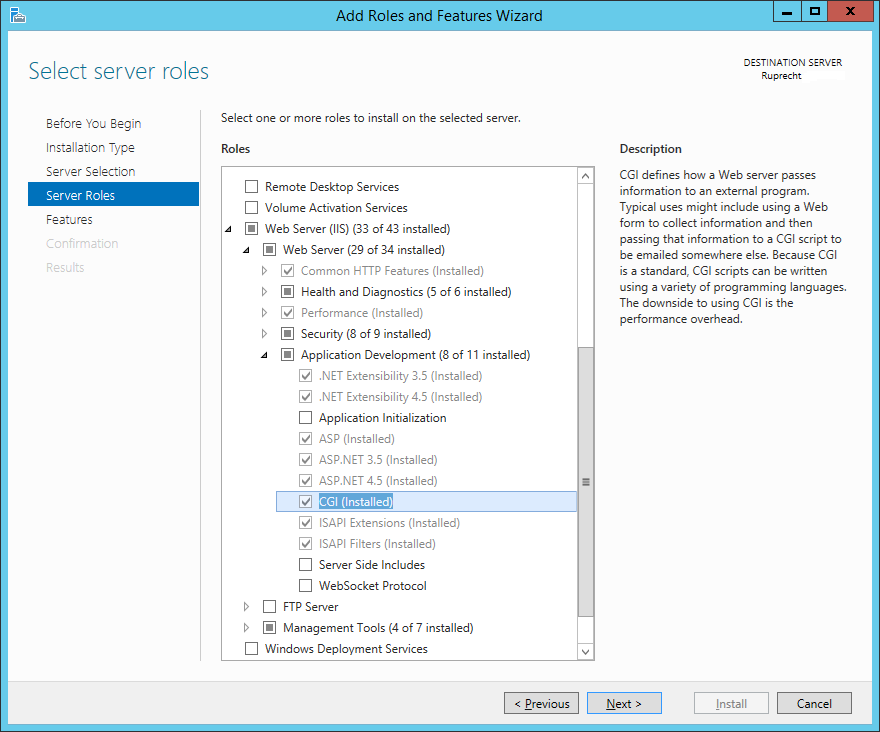
Chapter 4 – Configuring IIS Options
Open the Server Manager and make sure the CGI support is installed.
After that, you need to tell the IIS how to handle *.php files. Open the IIS Manager, select your server and click Handler Mappings (note that you should see the CGI and FastCGI Settings icons).
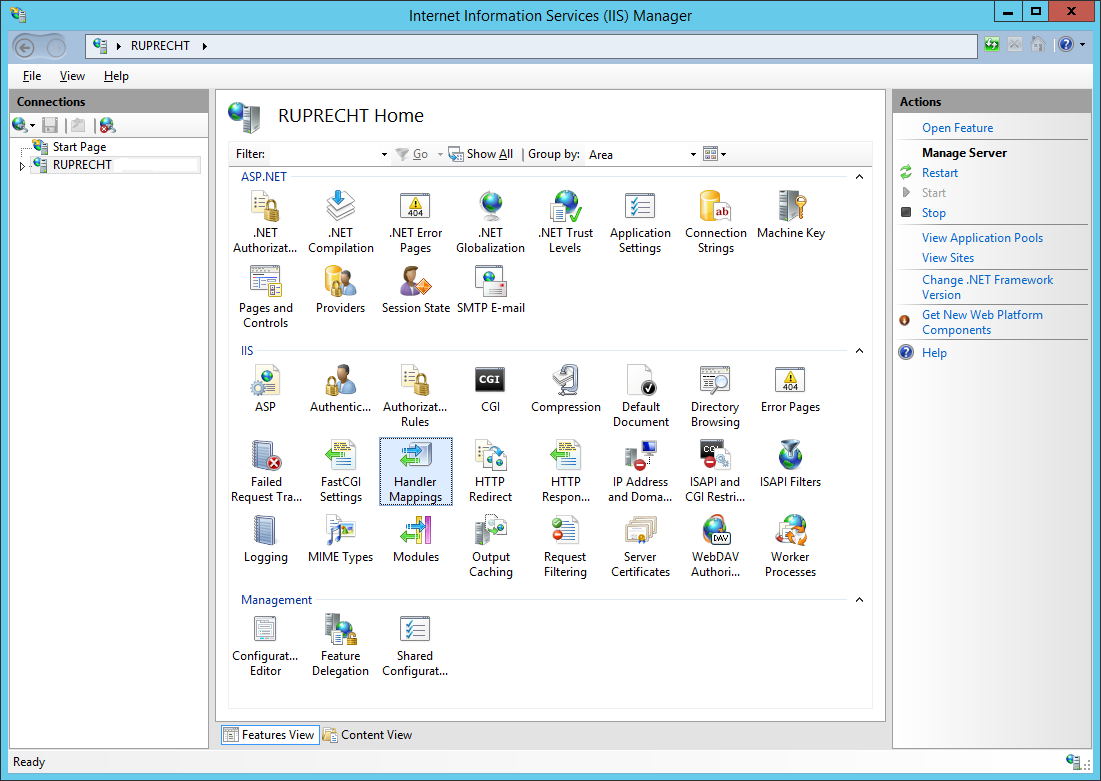
In the Handler Mappings right section click Add Module Mapping and write these values:
When you click OK a dialog Do you want to create a FastCGI application for this executable should pop up. Click Yes.
Now, we must tell the IIS what to do with index.php . Back in the IIS Manager, click Default Document and add index.php. Set the priority down under index.html, or as you see fit.
Note: Since IIS 7.5, there is responseBufferLimit set to 4MiB (4194304 bytes). Therefore, WordPress won’t show up an installation progress (downloading… unpacking… etc.) but it suddenly displays whole page at once. To fix this, we must change responseBufferLimit to 0. It can be done several ways, read this article:
http://stackoverflow.com/questions/7178514/php-flush-stopped-flushing-in-iis7-5
At this point it all should be ready for first test.
Chapter 5 – First PHP test
Before we begin installing phpMyAdmin, we should test whether PHP is running. Delete content of the default website (usually located in C:\inetpub\wwwroot) and within that folder create file index.php with following content:
<?php
phpinfo();
?>
After you save this file, open the browser and type you server address (or http://localhost if you’re at server) in the address bar. You should see PHP information page. If you see any error you need to double check the settings. To enable detailed error reporting, open the IIS Manager, at left pane choose your server and click Error Pages icon. In the Left pane click Edit Feature Setting and choose Detailed Errors (dont forget to set this back as it may be security issue – the attacker might see the a bits of code.) Also check your C:\PHP\php55_errors.log
Chapter 6 – Installing phpMyAdmin
First of all, open the IIS Manager and stop the default web site! Then select your server at the left pane and create a new Self Signed SSL certificate for WEB (using Server certificates icon). We gonna use it later for the https.
Create new folder C:\DATA\Webs\ and alow local user IIS_IUSR to
- Modify
- Read & Execute
- List folder contents
- Read
- Write
Note: This is not very secure as it gives Internet Users rights to modify the folder content. Security is beyond scope of this guide.
In the C:\DATA\Webs\ create folder pma and unpack content of the ZIPped release of phpMyAdmin 4.2.4.
In the pma folder, create config folder.
In the IIS Manager, add new web site.
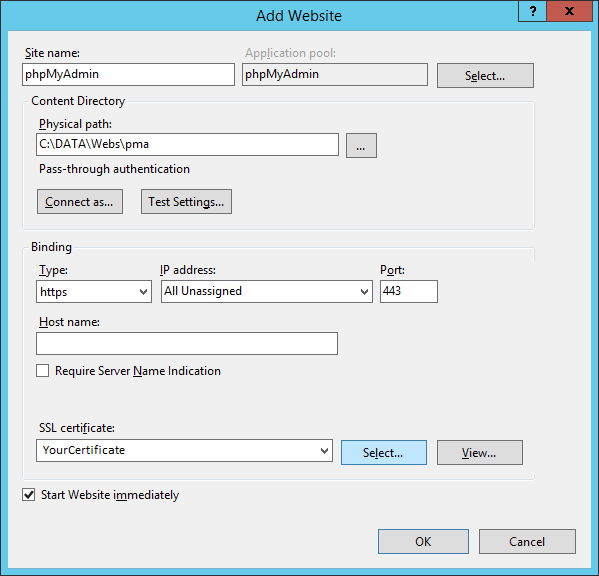
It’s a good practice to use phpMyAdmin over https. We leave the Hostname blank as we want this website to be abvailable under any https address. Click OK. Then, try to open you new website in the browser by typing https://localhost/ to browser’s url. Confirm the SSL warning by adding the exception.
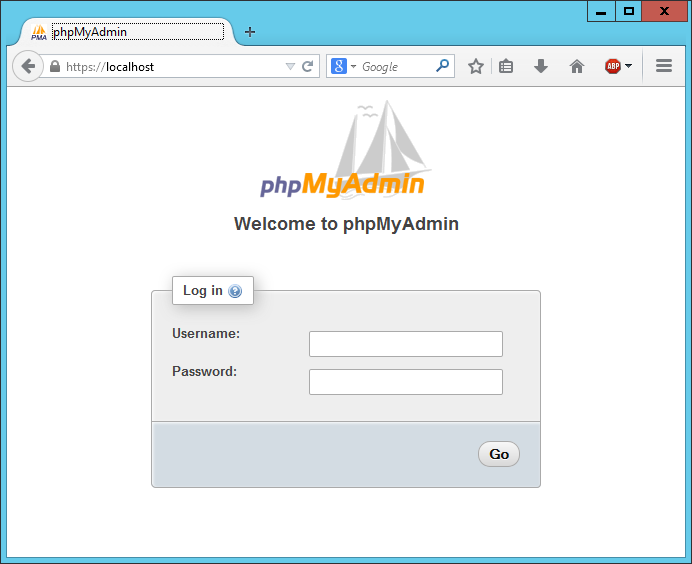
Note: If you see PHP error at line 177, the php-cgi.exe probably cannot see the EXT folder or your php.ini extensions are not configured properly.
Type https://localhost/setup/in the browser and configure your phpMyAdmin. The configuration is beyond scope of this guide.
Chapter 7 – Installing WordPress
Since we got the phpMyAdmin working, the hard bit is over. From now on its a piece of cake.
Note: Before wordpress installation, make sure the phpMyAdmin we have installed before has right bindings (IIS manager > right click on website > Edit Bindings). In our example, we remove http (port 80) from PMA so the PMA will still be accessible from any adress but over https only. This leaves port 80 free for WP site.
In C:\DATA\Webs\ create new folder WordPress. Don’t bother with the rights. These are inherited from superior folder and we set it previously. Unzip latest WordPress into WordPress folder.
In the IIS Manager, create a new website with it’s home directory set to C:\DATA\Webs\Wordpress. Type localhost into the web browser:
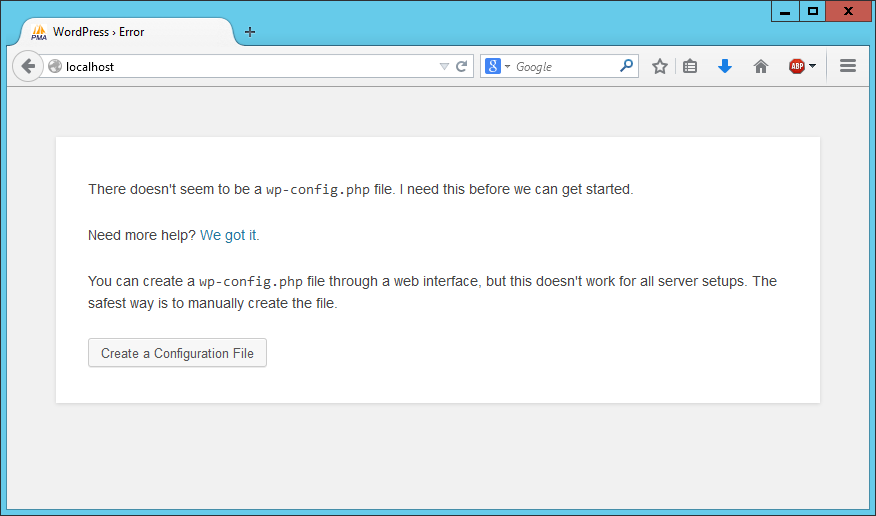
Click Create Configuration File.
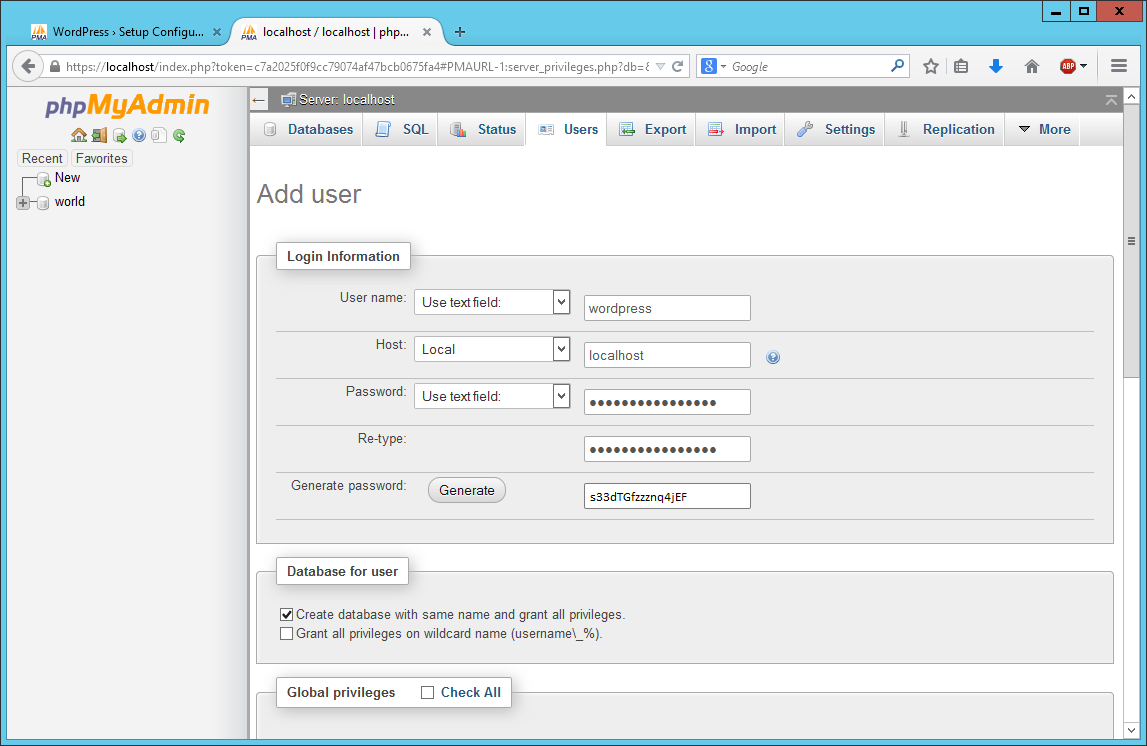
Now we need to create a wordpress user and database to be used with your wordpress site.
Open phpMyAdmin by typing https://localhost and login with your Admin credentials. Create user, tick Create database with same name and grant all privilegs. Do NOT grant global privilegs. Before clicking GO copy the generated password to the clipboard.
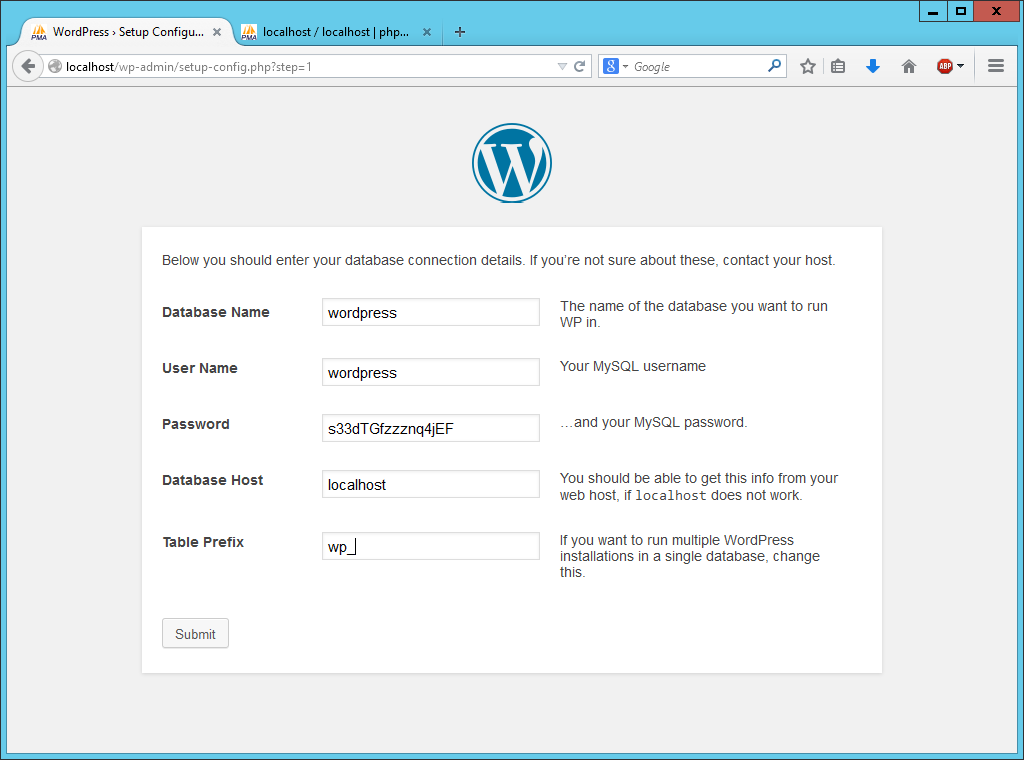
Go back to your WP session. Fill up the form. Paste the password.
Create your login
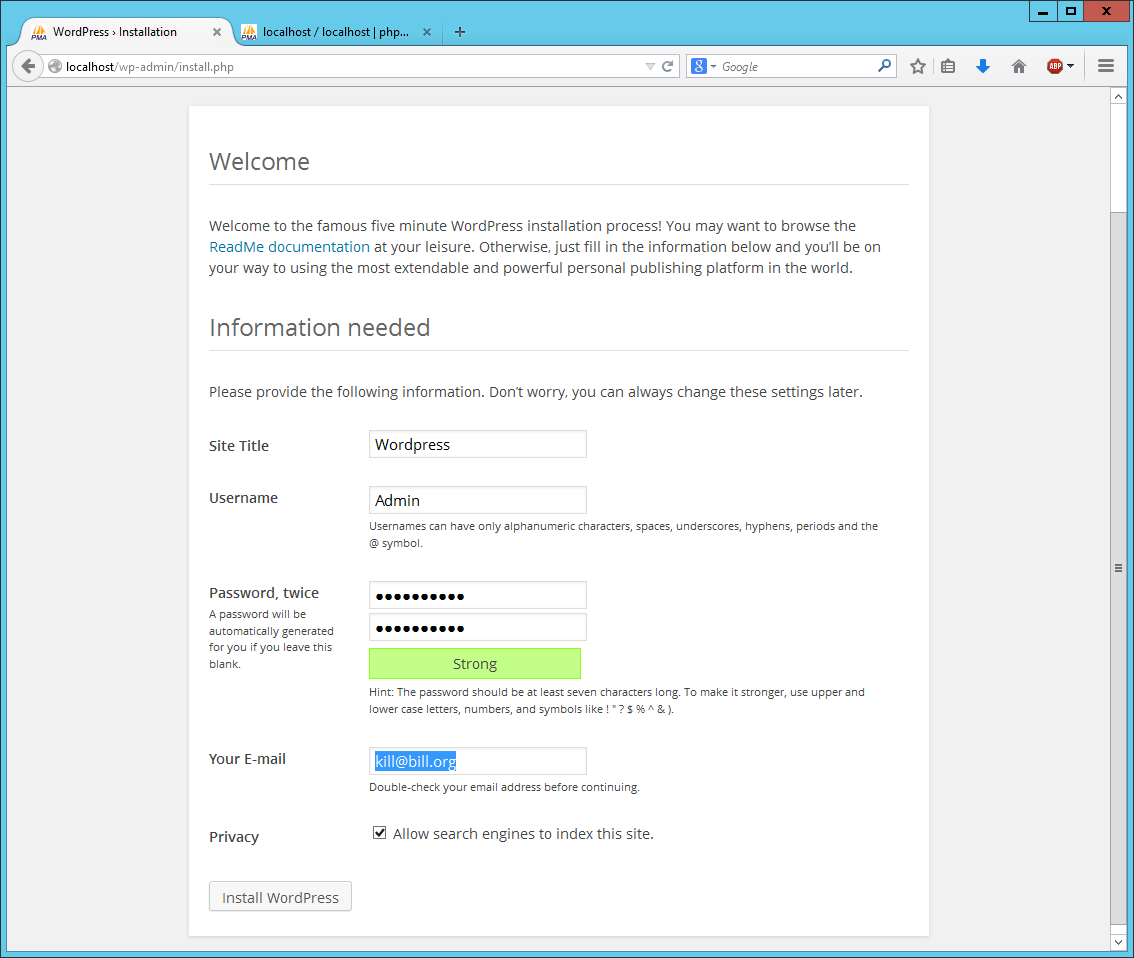
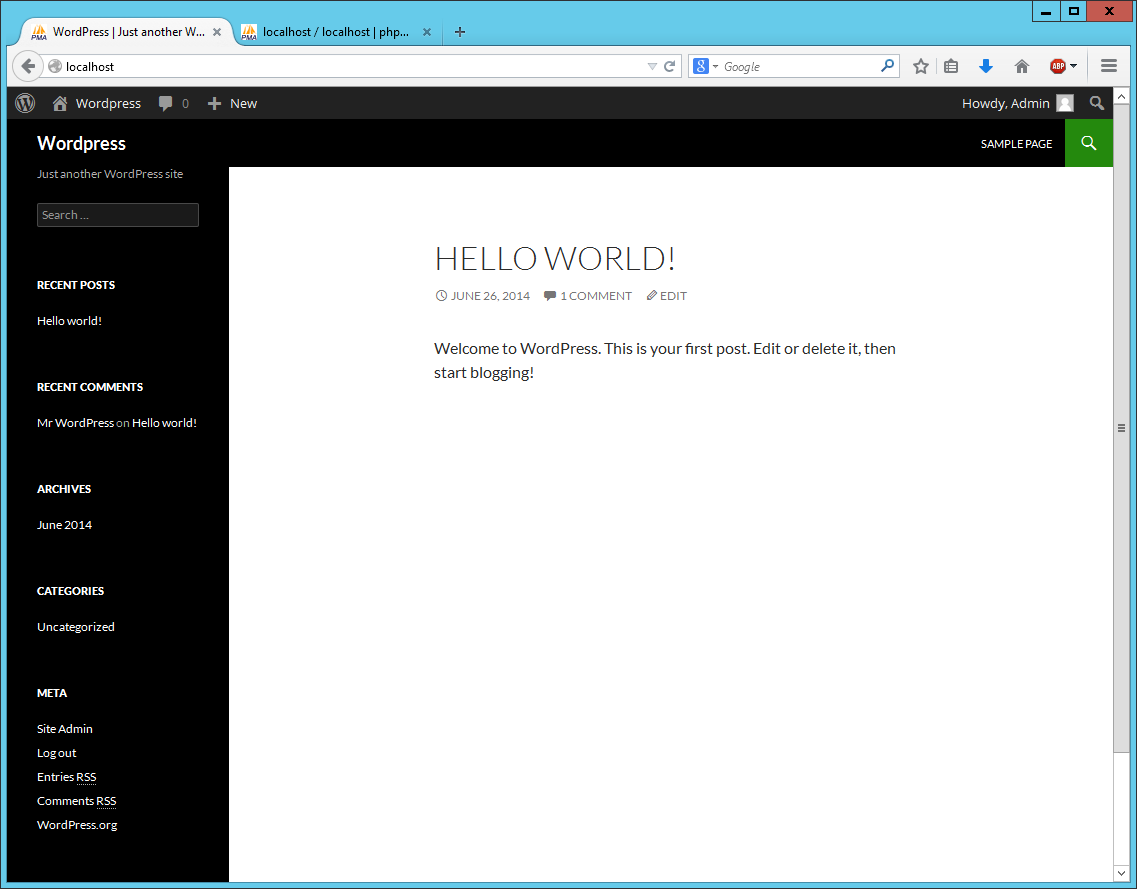
Done.
Note: At this moment you should secure the folder rights, but again, this is beyond scope of this document … see Hardening WordPress article.
Peace!
This seems simple enough to setup, I’m sure this will help lots of people.
Hi, I am having trouble with this (I am using Windows Server 2008 r2 but I guess the steps are similar).PHP, MySQL and WordPress are working fine but phpMyAdmin is not.The HTML code is generated but it is not visible – I just see a blank screen in IE8.Any help would be much appreciated!thanksRick
Hi Rick. It seems to me more like the IE’s problem. Did you try other browsers? Anyway, you can temporary enable the Error Reporting to see whats going on (http://blogs.msdn.com/b/rakkimk/archive/2007/05/25/iis7-how-to-enable-the-detailed-error-messages-for-the-website-while-browsed-from-for-the-client-browsers.aspx)