Some black keys must be pressed hard to actually play the sound. The cause, believe it or not, is the poor design of the black keys. Here is how to fix it.
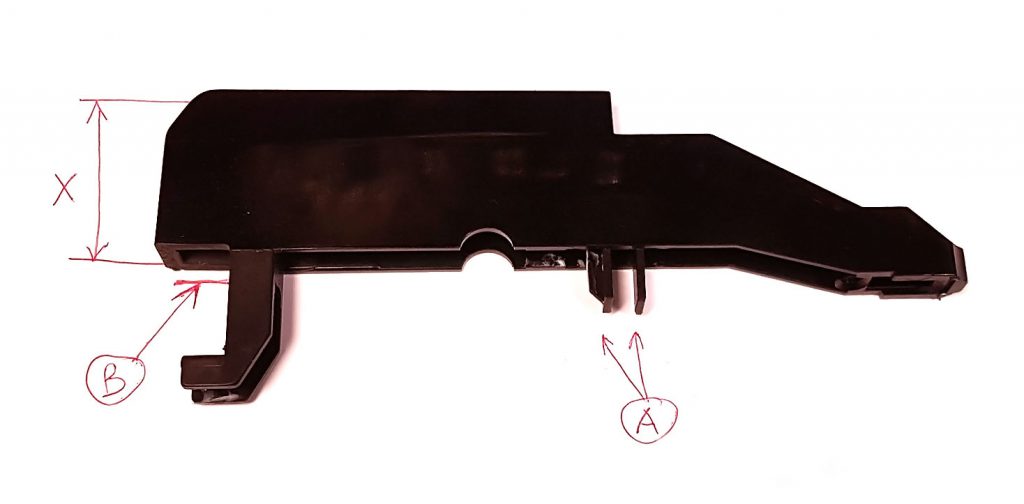
Each key has two protrusions underneath (marked A) These protrusions press the rubber contact to the circuit board when the key is pressed. They are shorter on black keys than on white keys. When the black key hits the Aftertouch when pressed, the protrusions do not press the rubber contact well. This causes poor sensitivity of the black keys.
The place where the key hits the Aftertouch (felt) is marked “B”. If you take the measurement of X you should get exactly 1.5″
Each black key must be trimmed at the area marked “B”. The X measurement must be approx between 1.45″ to 1.46″ The trimmed area must be flat and horizontal! Do not trim more than to 1.45″ otherwise the Aftertouch will stop working and the key will rest on the counterweight.
Thanks to this modification, the black keys can be pressed a little deeper and thus the rubber contact has a better connection.
The picture above shows the modified key. You have to remove approx 1.3mm of the plastic, not more! Zoom in the picture, you should see the trimming. I have used the bench disc sander as it has an adjustable guide and it is fast.
After grinding you have to make sure there is no dust inside the key. You have to clean it well. I recommend to put fresh lube on every rubber guide. Recommended lubricant is Yamaha AAX90710 (Molykote G-1066Y). Do not use thick silicon lubes as it will make the keys sticky and slow.
After assembling, the piano works as a charm.
P.S. Replacing the rubber contacts will not solve this problem. Or maybe for a short time. Trimming the keys should be more permanent solution.
